3.
There are now a number of ways to clean up that ugly seam. Many
people use the Rubber Stamp tool, but I prefer to use the Smudge
tool. It's a lot like finger painting. Just drag the Smudge
tool, set to a small or medium brush size, across the center
seam a couple of times. You can constrain the tool (as you can
many other Photoshop tools) to a straight line by holding down
the Shift key while you click the Smudge tool at either end
of the straight line you're creating.
Another
way to clean up those seams is to grab a piece of the image
and copy it and paste it over the seam. Use the Lasso selection
tool to make a small, irregular selection. Apply Select/Feather
at 2 pixels. Apply Edit/Copy, (or Control+C on Windows, Command+C
on the Mac), Edit/Paste (or Control+V on Windows, Command+V
on the Mac), and drag or nudge (using the arrow keys) the patch
over a seam. Continue patching until all the seams are covered.
You'll need to apply Layers/Merge Down before you can save the
finished file.
A
third method to clean up pattern tile edges is to use a paint
tool. Since this pattern tile is made up of a very soft texture,
you can clean up the seams using the Airbrush tool set to a
small brush size and low opacity setting.
Now,
fill a larger selection to check how your image will look when
it is tiled and used as a background. Open a new file (or Control+N
on Windows, Command+N on the Mac), set to 300x300 pixels. This
is large enough to show the pattern tiled. Return to the seamless
tile you've created. Apply Select/All (or Control+A on Windows,
Command+A on the Mac), Edit/Define Pattern.
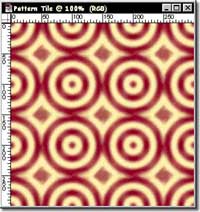
4.Next,
select the new file, and apply Edit/ Fill. Within the Fill dialog
box, select Use, Pattern; Opacity, 100%; and Mode, Normal. The
results will appear as shown in the example above. If you see
any obvious seams when the tile is repeated, you can clean them
up in the original file, using the smudge tool or the patch
method. Save this file as a .tif file, because we'll be using
it in Chapter 5 to demonstrate how to lower contrast in backgrounds
for web pages.