The
first step is to make a new file. I've made mine relatively
narrow, but if you want to feel free to make your buttons as
square or thin as you want. Note that I've made the file greyscale.
This makes it faster to work with and smaller to save.
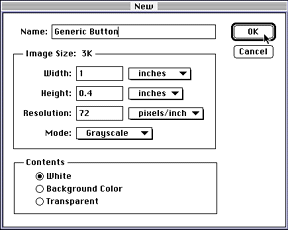
Next
I filled it with 25% K grey (this matches the 192,192,192
grey that is close to the usual grey background.) 25%
K grey can be selected using the slider on the color picker
window.
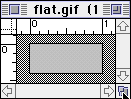
To
create the four trapezoids that make up the "bevels"
of the button,
the shapes are made using the paths tool.
The trapezoids are made using the "pen" tool.
Click in one corner of the box.
:::::.Next. ::::
Click in another corner of the box.
This makes the edge of the trapezoid that follows the outside
of the box.
Make
two more vertices;
the first should be some small (1/16" is good) away from
the second point,
diagonally in towards the center of the box.
Make sure this point is equally far from the two edges of the
box.
The second point should be an equal diagonal distance away from
the first point you made.
Finally,
move the cursor to the original point,
making sure a little "o" appears next to the pointer,
signifying that it is going to "close" the trapezoid. Click
to complete the shape.
The
first complete trapezoid.
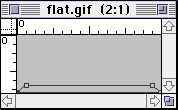
Save
the path!
Then make a copy of it (easiest done by pulling the new path's
name in the PATHS window down onto the little white notepad
icon at the bottom of the PATHS window.
Make
the copy into the opposite side's trapezoid in the following
way:
1.Select
the pointer tool from the paths window.
2.Select
the new path (the copy of the first trapezoid) in the PATHS
window.
3.Click
on one of the edges of the trapezoid that parallel the edge
of the box,
then drag it (holding the shift key down to keep it aligned)
up to the symmetrical position on the other side of the box.
For example, if it is the edge that is exactly at the edge of
the box, drag it to the far edge of the box.
4.
Drag the other edge of the trapezoid across to the other side
so that it is the same distance from the other edge as in the
original trapezoid.
You
should now have two trapezoids, on opposite sides of the grey
box. Each will become a bevelled side of the final button. Note
that they should be symmetrical - that is, a mirror image of
each other.
Make
the other two sides' trapezoids in the same manner. You may
want to jump to the top of the paths instructions.
Once
you have completed the four trapezoids, make sure to SAVE
in case of a problem later on.
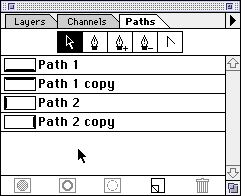
The
PATHS menu after all four paths have been made.
Next,
fill each of the trapezoids with the following colors. This
is done fastest by picking the grey as the foreground color,
then pulling the name of the path in the PATHS windows onto
the fill icon at the bottom of the PATHS windows (the little
filled circle.)
I
usally fill the four trapezoids with the following greys:
- Bottom:
90% K
- Top:
5% K
- Left:
15% K
- Right:
60%
Note
that what is important here is no the actual number but the
relation between the numbers; the one on top should be lightest,
the bottom the darkest, and the left and right should be between
the top and bottom tones and the original color, correspondingly
lighter or darker than the original.
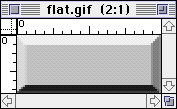
After
you fill the trapezoids, the button will now look 3-D:
Finally, I usually add a black line around the outside of the
button. This gives the impression that the button is physically
seperate from the surface of the page, especially if you choose
to turn off the link borders.
This is done by selecting all (OpenApple-A) then using the select...modify...border
command set to one pixel.
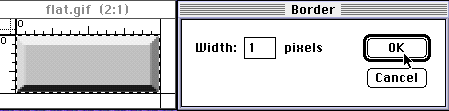
Next
set the foreground color to 95% K then use the edit...fill
command to make the border.
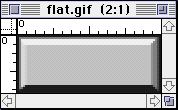
The
button after the border is applied.
Finally, save the button as a GIF if you want to use it immediately.
Of course you might want to add text and colors. The text often
is helpful to users, who might want to know what a button does
before pushing on it. This is considered user-oriented engineering.
The
final result:

Some other incarnations of the same basic button, created using
KPT Texture explorer and applying using Procedural Apply. You
can add your own textures using the hard or soft light or overlay
methods. Play around until you find what works for you!

